Boot-camp: week-01

Overview:
Welcome to week-1 of the DSAN bootcamp!!! The following outline provides a summary of the topics we will be covering this week.
- Hardware: long-term storage (HARD-DISK), short-term memory (RAM/CACHE), Central processing unit (CPU) “i.e. the computer’s brain”, graphical processing unit (GPU)
- Software: Directory trees & paths, files and permissions, command line basics (power-shell and/or mac/linux)
- Introduction to Visual studio code (VSC):
- Introduction to python: What is python, python interpreters, python “hello world”, version control and installing/introducing conda
- Different ways to run/code python:
Method-1:(text editor+command-line) : Very general, works for any computer language: R, C, python, HTML, JS, etc (preferred DSAN coding enviroment: Visual-studio-code)Method-2:(IDE: Integrated design environments): Language specific but added functionality- Spyder, VS-Code, Rstudio, etc
Method-3:(Jupyter): The Jupyter Notebook is a web-based interactive computing platform.- python (.py) vs jupyter notebooks (.ipynb), Google-co-lab
- Setting up your laptop for programming and data science
By the end of this module, you will be capable of answering the following questions (give them a try!):
Note: Answering the questions is NOT required, however, the questions are designed to look like sample interview questions and will test your knowledge of the materials in this module.
- Do the following using only the command line: change your current working directory to your Downloads folder and open a .txt file.
- How do the CPU and GPU differ in their roles for data processing?
- What is a file path and a directory tree?
- How could you reference the file “my_beautiful_text.txt” that is two levels above the current directory using a relative path, what about an absolute path?
- What is the purpose of using Conda for Python programming? Explain what a “conda environment” is and why it’s beneficial to use when working on data science projects.
Lecture:
Most weeks (i.e. 2 to 8) in the boot camp will consist of an educational coding tutorial, a guided video which walks you through the tutorial, and a homework assignment.
The first week, however, is a little different. It focuses more on broader conceptual topics, rather than coding exercises. The lesson for this week consists of various videos which will get you up to speed with the fundamental concepts required for the DSAN-program. The videos cover fundamental computer science, software tools, mathematics, and an introduction to python, html, and markdown.
What you need to do:
First, watch the videos below. Feel free to watch them at 1.5 or even 2X speed, however, please watch them from start to finish, even if you are already familiar with the content. This will ensure that everyone is coming into the boot-camp with the same set of fundamental skills needed to succeed.
When you are done with the videos, complete the assignment below.
Controlling video speed
For some videos, you will likely want to speed them up, or slow them down.
CONTROLLING VIDEO PLAYBACK SPEED: To speed up, or slow down the video, right click the video, select show all controls, click the three vertical dots on the left, and select the desired playback speed.
Mathematics reivew content
The link below contains a curated collection of free, open-source resources covering the foundational mathematics that underpin the DSAN program, and data science more broadly. Students with heavily quantitative backgrounds (math, statistics, physics, computer science, engineering, etc.) may find much of this material familiar and can either skim it, or skip it if you are already comfortable with the content. Those from less quantitative disciplines are highly encouraged to review it thoroughly to build a more solid foundation for the coursework ahead.
Reviewing this material is not required and is not a prerequisite for starting the bootcamp, but if you are less familiar with these concepts, then starting early will be helpful and is recommended. You can also work through it in parallel over the summer as you progress through the bootcamp. Again, we highly recommend it as a refresher or supplemental guide.
Computer hardware fundamentals
Video covers: computer hardware fundaments, processing paradigms, parallel processing
Note: The shelves of the grocery store are probably a better analogy, than the grocery cart, for the computer’s hard-disk, however, the idea is similar.
Laptop Recommendation (optional)
The following is for anyone who is thinking of buying a new laptop before entering the DSAN program, feel free to skip this section.
The field of data science is generally computationally intensive, when shopping for a laptop, ideally lean towards better hardware rather than a cheaper laptop (e.g. 500GB to 1TB storage, 8 to 16GB RAM, decent multi-core processor (8 to 16 CPU cores), etc). However, it is not strictly necessary; you can certainly get by with less. For example, you could complete the program with a MacBook Air or something similar. Also, keep in mind that when you leave the program, you will likely get a business laptop from your future employer, and will likely end up doing most of the computational “heavy lifting” on cloud-based services (AWS, Azure, etc).
Unix environments (Mac and Linux) are generally better for software development because there is a built-in command line and more intuitive integration with the file system. However, Windows also has the Windows Subsystem for Linux (WSL), which is a great option for developers.
A MacBook Pro is well suited for the program, or a Windows machine with similar specs, rather than a cheap laptop. You can buy 1 or 2 year old computers if you want to save money. For example, typing “2021 MacBook Pro 16 renewed” on Amazon will give you used, renewed, and refurbished options, which can save 500-1000$. You can also get really decent specs on the Windows side with a 2019-2021 laptop. Lenovo or Dell are “flagship” business laptops, so the market is flooded with them, and you can get them very cheap.
Whatever you buy, aim for higher-end specs: 8 to 16 CPU cores, 8-16 GB of RAM, 512GB to 1-TB of hard disk space. Finally, don’t go too far back in time, i.e., avoid older than 2019, since the operating systems (Windows and macOS) are usually only supported for around 10 years or so. Unless you want to switch 100% to a Linux operating system, which are generally supported for a longer time (not recommended).
File structures, paths, and the command line
Fundamental concepts
Command-line-interface (CLI) (i.e.
terminal)- The command line on Linux and Mac (or Windows with WSL installed, see below) is a text-based interface where users can interact with the operating system by typing commands.
- It provides direct access to system resources and allows users to perform various tasks such as navigating the file system, executing programs, managing files, and configuring system settings.
- The command line is often preferred by developers, administrators, and power users for its flexibility, efficiency, and ability to automate tasks through scripting.
- It is accessed through a terminal emulator application, providing a powerful alternative to graphical user interfaces (GUI) for advanced users.
Getting terminal (CLI) Access
MacOS: To access the terminal on Mac, navigate to Applications -> Utilities -> Terminal. Alternatively, use Spotlight (Cmd + Space) and type “Terminal” to launch it instantly.Linux: To access the terminal on Ubuntu, use the keyboard shortcut Ctrl + Alt + T, or search for “Terminal” in the applications menu and click to open it.Windows:To access the Linux terminal on Windows, use the Windows Subsystem for Linux (WSL). Install a Linux distribution from the Microsoft Store, then launch the terminal application (see below for more information).
Remote vs local computer access: In computer science, “local” refers to resources or operations performed on the same system or device, i.e. on your laptop, while “remote” involves accessing or controlling resources on a different system or device over a network, i.e. on a server somewhere.
Linux Commands:
- Programs or utilities used to perform specific tasks in a Linux environment.
- Can be executed from the command line interface (CLI) or terminal.
- Range from basic file management commands (
ls,cd,mkdir) to advanced system administration tools (grep,awk,sed). - Often have options or flags that modify their behavior.
- Facilitate tasks such as file manipulation, text processing, system monitoring, and network management.
- Allow users to interact with the operating system and perform various operations efficiently.
Linux Command Flag:
- Flags are options or parameters that modify the behavior of a command.
- They are usually preceded by a hyphen (-) and followed by a letter or word.
- Flags can change how a command operates by enabling or disabling certain features.
- They provide flexibility and customization options, allowing users to tailor command behavior to their specific needs.
- Flags can control various aspects of a command, such as output format, verbosity, and operational modes.
- Common examples include
-lfor long listing format inlscommand, i.e.ls -lorls -ltrand-rfor recursive operation incpcommand, i.e.cp -r source_folder destination_folderto copy a folder.
File System:
- A hierarchical structure for organizing and storing files on a computer.
- It manages how data is stored, retrieved, and organized on storage devices.
Directory Tree in a Linux System:
- Represents the hierarchical organization of directories (folders) and subdirectories.
- The root directory (“/”) is the
top-leveldirectory (from a top down perspective),with subdirectories branching out. An alternative convention is to think of it as thebottom-levelof the computer (i.e. bottom-up perspective).
Relative and Absolute Paths:
- Relative Path: Specifies the location of a file or directory relative to the current directory.
- Absolute Path: Specifies the complete path starting from the root directory (“/”).
Common Linux Commands:
- pwd: Prints the current working directory.
- ls: Lists the contents of a directory.
- cd: Changes the current working directory.
This video below discusses interacting with a computer via the command line. It applies to Mac and linux computers, since they have essentially the same command line interface and file structure.
Windows machines also have a hierarchical file-structure, however, they don’t have the same command line interface. The Unix command line can be mimicked on Windows using Conda-powershell or various other Linux emulating tools, such as Windows subsystem for Linux WSL.
IMPORTANT:Ignore theoptionaltag in the video”,THIS VIDEO IS NOT OPTIONAL.- Understanding the directory tree and file paths is EXTREMELY important for nearly all technical and STEM disciplines, including Data-science
Concise list of most common Linux/Mac commands
Here are some additional popular commands, it is good to be familiar with them.
- ls: Lists directory contents.
- cd: Changes the current directory.
- pwd: Prints the current working directory.
- mkdir: Creates a new directory.
- rm: Removes files or directories. (BE CAREFUL WITH THIS ONE)
- cp: Copies files and directories.
- mv: Moves or renames files and directories.
- nano: Popular Command-line text editor
- vim: Popular Command-line text editor
- top: Displays real-time information about system processes, CPU, memory usage, and more in a terminal interface.
- grep: Searches for patterns in files.
- chmod: Changes file permissions.
- sudo: Executes a command with superuser privileges.
- apt-get/yum: Package managers for installing, updating, and managing software packages.
- sed:
- Stream Editor, processes text line by line, performs transformations, substitutions, deletions.
- Used for batch editing, scripting, and text processing.
- awk:
- Text processing language, extracts and manipulates data, supports pattern scanning and processing.
- Enables data manipulation, reporting, and formatting.
- more:
- Pages text, displaying one screenful at a time, forward scrolling.
- Commonly used for viewing large files.
- less:
- Advanced pager, allows forward and backward scrolling, provides search functionality.
- Suitable for extensive text reading and exploration.
- tail:
- Displays last few lines of a file, useful for monitoring logs or recent updates.
- Can stream updates to terminal as new data is added to the file.
Interpreted vs compiled languages
Scripted or interpreted languages are executed line by line by an interpreter, converting code to machine instructions in real-time. They are typically easier to write and debug but can be slower than compiled languages. Examples include Python, R, JavaScript, and PHP.
Compiled languages, on the other hand, are translated entirely into machine code before execution, resulting in faster performance but requiring a separate compilation step before running. Examples include C, C++, and Java (although Java is technically both compiled and interpreted).
In the DSAN program, we confine ourselves largely to interpreted languages, e.g. R and Python.
Codes and interpreters
Ultimately, python codes are simply text files, for example the file my_file.py might contain
one line --> print('hello').
When you “run” a python code, you need to invoke a python interpreter (also called a kernel). For example, you could run the file “my_file.py” from the command line using the following commands
python my_file.py
You can see the path to your interprets with the command which python from the CLI.
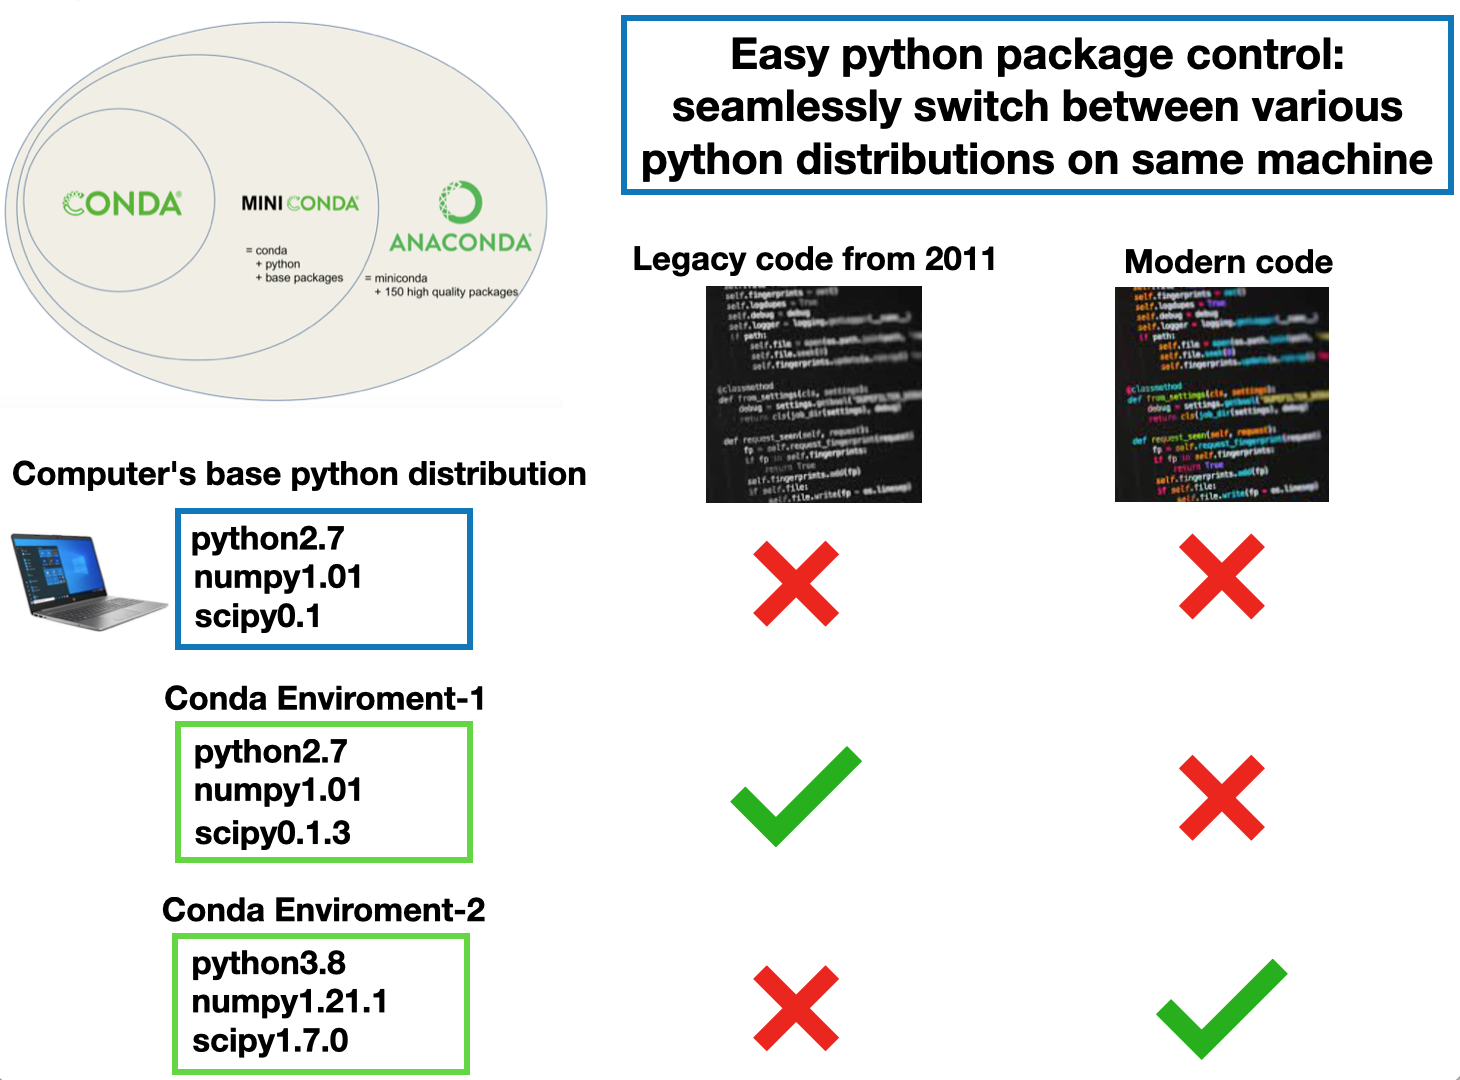
In this command “python” is “pointing” at a particular interpreter on your computer. The interpreter will parse the python file and attempt to execute it. Your computer typically will have more than one python interpreter. Each interpreter will have a different python version and different set of installed packages. For example one interpreter might have python2.7 with numpy1.01 installed, while another interpreter may have python3.0 with numpy1.2. Depending on the packages in the python file you are trying to execute, the code may or may not run.
IMPORTANT NOTE: Comments in Python are lines that start with the “#” character. These lines are ignored by the interpreter and therefore don’t affect the code. They are included for humans to better understand what is happening inside the code.
Markdown
Markdown is a lightweight markup language used for formatting plain text, commonly employed for creating structured documents with headings, lists, links, and emphasis in a readable manner.
Common file types
- .md Files:
- Markdown files.
- Plain text files formatted using Markdown syntax.
- Commonly used for creating documentation, README files, and blog posts.
- .rmd Files:
- R Markdown files.
- Markdown files that support embedded R code chunks.
- Used for creating dynamic documents that blend narrative text, code, and output in RStudio.
- .qmd Files:
- Quarto Markdown files.
- Generalization of
rmdto python and other coding languages (more on this later in the bootcamp)
Markdown is very easy, you can learn it in an hour or two. But you should be come proficient in it, since it is the method that computer and data scientist commonly use to share information.
Markdown is important for data scientists to learn because:
- Documentation: It allows data scientists to create well-structured and easily understandable documentation for their code, analyses, and findings.
- Communication: Markdown enables clear communication of ideas, methodologies, and results with collaborators, stakeholders, and the broader community.
- HTML integration: Integrates easily with HTML, facilities rapid website and interactive document generation.
- Reproducibility: By combining code, narrative text, and visualizations in a single document, Markdown promotes reproducible research practices, making it easier for others to understand and replicate analyses.
- Integration: Many tools and platforms used in data science, such as Jupyter Notebook, GitHub, and RStudio, support Markdown, allowing seamless integration of code, text, and visualizations.
- Flexibility: Markdown offers a simple and flexible syntax for formatting text, making it easy to create professional-looking documents without extensive knowledge of HTML or other markup languages.
- Version Control: Markdown files are plain text files, making them suitable for version control systems like Git, which is crucial for tracking changes and collaborating on data science projects effectively.
Why is markdown popular? One reason is that it is “plain-text”, so you can focus MORE on content development and LESS on document formatting.
To get started with Markdown:
Choose a Markdown Editor: Use any plain-text editor like Notepad (Windows), TextEdit (Mac), or a dedicated Markdown editor like Typora, Visual Studio Code, or Atom.
- Optional online markdown editor: https://stackedit.io/
Learn Markdown Syntax: Familiarize yourself with Markdown syntax. You can find cheat sheets and tutorials online from platforms like GitHub, Markdown Guide, and CommonMark.
- Markdown Cheatsheet-1
- Markdown Cheatsheet-2[https://www.markdownguide.org/cheat-sheet/]
Practice Basic Formatting: Start with basic Markdown elements such as headers (
#), emphasis (bold**or italic_), lists (-or1.), and links ([text](URL)).Experiment with Advanced Features: Explore advanced features like images (
), code blocks (````), tables (| Header | Header |), and task lists (- [ ] Task 1`).Preview Your Markdown: Many Markdown editors provide a live preview feature that allows you to see how your Markdown text will look when rendered. Use this feature to ensure your formatting appears as intended.
Use Online Resources: Utilize online Markdown editors or platforms like GitHub, GitLab, or Stack Overflow to practice and collaborate with others.
Refer to Documentation: Keep Markdown documentation handy for reference as you learn and experiment with different formatting options.
Practice Regularly: The more you practice using Markdown, the more comfortable and proficient you’ll become. Experiment with different formatting options to see what works best for your needs.
Jupyter notebooks
A .ipynb file is a notebook file format used by Jupyter Notebook, an open-source web application that allows users to create and share documents containing live code, equations, visualizations, and narrative text. It stands for “interactive Python notebook” and can contain Python code, Markdown text, mathematical equations, plots, and more.
The main difference between .py and .ipynb files lies in their format and intended use:
.pyfiles:- Standard Python script files.
- Contain Python code only.
- Executed in a Python interpreter.
- Typically used for writing and running Python scripts or modules.
.ipynbfiles:- Jupyter Notebook files.
- Combine code, text, visualizations, and other rich content.
- Used within the Jupyter environment for interactive computing.
- Support both code execution and narrative text (Markdown).
- Facilitate exploratory data analysis, prototyping, and documentation tasks.
“Under the hood” .ipynb files are essentially JSON (JavaScript Object Notation) files. JSON is a lightweight data-interchange format that is easy for humans to read and write, and easy for machines to parse and generate. In the case of Jupyter Notebook, the JSON format is used to store metadata about the notebook, the structure of the notebook itself, and the content within each cell. This includes information such as cell type (code, markdown, etc.), cell content, cell outputs (such as code execution results or visualizations), and kernel information. Therefore, .ipynb files can be viewed as structured collections of data represented in a human-readable format.
Anaconda and conda environments
As you begin your coursework, you will frequently encounter the terms Conda, Anaconda, and Miniforge. Understanding the distinctions between these tools, and how they manage Python, will save you significant time and storage space during your studies.
The Core Tool: Conda
Conda is a command-line interface (CLI) tool that acts as both a package manager and an environment manager. It is the fundamental engine behind all of these setups.
As a Python user, you need to be able to control which Python interpreter you invoke and precisely which packages are installed within it. Conda achieves this by creating Conda environments.
- What is a Sandbox? Each Conda environment is a isolated “sandbox”, a computing term for a mechanism that separates running programs to prevent software conflicts or system failures from spreading. Each sandbox contains a unique Python interpreter with its own dedicated set of packages.
- Handling Legacy Code: Many data science models written years ago (“legacy codes”) only work with the specific package versions available at that time. If you try to run them with modern packages, the code will break. Conda environments allow you to easily set up a sandbox with older packages installed, which is far faster than rewriting years of legacy code to fit modern standards.
- How to use it: You do not install Conda entirely on its own; instead, you get it by installing a software distribution like Miniforge. You can easily manage your environments using this Conda Cheatsheet.
Miniforge: (recommended)
Miniforge is a lightweight, community-backed installer that provides Python, Conda, and a bare-minimum set of essentials.
- The Command Line Advantage: Miniforge forces you to interact with Conda via the command line from day one. Developing CLI literacy is a vital, non-negotiable skill for professional data scientists and developers.
- The conda-forge Repository: Miniforge is pre-configured to download packages from conda-forge, a massive, community-maintained ecosystem. This repository is widely considered the industry standard because it updates faster and offers better compatibility, especially for modern hardware like Apple Silicon (M-series) Macs and ARM-based Windows laptops.
- Efficiency: It uses minimal disk space, downloading only the exact libraries you explicitly request.
Full Anaconda (not-recommended)
Anaconda is a commercial software distribution of the Python programming language tailored for scientific computing (data science, machine learning applications, large-scale data processing, and predictive analytics). It includes packages compatible with Windows, Linux, and macOS, and aims to simplify package management and deployment by bundling Conda with over 250 pre-installed data science packages. It also includes a desktop application called Anaconda Navigator, allowing users to manage environments via a Graphical User Interface (GUI) rather than the command line.
While it sounds convenient, full Anaconda is generally discouraged for this program for several reasons:
- Bloatware: It requires several gigabytes of storage space, installing hundreds of packages you will likely never use in your coursework.
- Dependency Conflicts: Because it forces a massive batch of pre-installed software onto your system, updating a single package later can lead to long wait times or broken environment configurations.
- The GUI Trap: Relying on the visual Anaconda Navigator app prevents you from learning the command-line workflows that are expected in advanced courses and professional data science roles.
Summary comparison
| Distribution | Included Engine | Package Repository | Pre-installed Packages | Recommended For This Program? |
|---|---|---|---|---|
| Miniforge | Conda (Command Line) | conda-forge (Community) | Minimal (Python + Conda only) | Yes. Highly recommended for speed, efficiency, and building command-line skills. |
| Anaconda | Conda + Navigator GUI | Anaconda Defaults (Commercial) | 250+ packages pre-installed | No. Discouraged due to high storage bloat, slower updates, and lack of CLI emphasis. |
VS-code
Since python codes are simply text files, all we need to write code is a text editor and an interpreter to run the file. However, not all text editors are created equal. Some are more “code friendly” than others. The most popular text editor for coding is Visual Studio Code, also commonly referred to as VS-Code. Due to its popularity and ease of use, it is the preferred python coding platform for the DSAN program.
What is VS-code? It is a source-code editor made by Microsoft for Windows, Linux and macOS. Features include support for debugging, syntax highlighting, intelligent code completion, snippets, code refactoring, and embedded Git. Users can change the theme, keyboard shortcuts, preferences, and install extensions that add additional functionality. In the Stack Overflow 2021 Developer Survey, Visual Studio Code was ranked the most popular developer environment tool, with 70% of 82,000 respondents reporting that they use it.
Optional: Window users can watch the following video to see how to install conda and VS code, as well as see them in action
As mentioned above, it is recommended that you use Miniforge instead of the full Anaconda distribution. Users can fast forward through the beginning of the video to the section discussing Visual Studio Code.
Assignment
This week’s assignment is included to ensure that everyone has the required software tools installed and running on their computer. After you have “digested” the lesson content, start the assignment.
To begin, create a folder to store your work using the following naming convention for the folder: FIRSTNAME_LASTNAME_ASSIGNMENT1. When you are done, compress the folder as a .zip (i.e. FIRSTNAME_LASTNAME_ASSIGNMENT1.zip). Then email the completed assignment in the compressed folder to your designated TA.
- For example, If your name was Jane Doe, then the zipped folder should be called JANE_DOE_ASSIGNMENT1.zip
Computer setup
Please set your computer up with the required software, if you have not done so already
IMPORTANT: Students can configure their computer however they like, however, ideally please use the following set-up. It gets all students on the same code-base, which standardizes problems and helps faculty solve issues more quickly.
Mac
Setting up your Mac for Data science.
IMPORTANT: When installing software, always sure you are using the correct installer for your Mac’s chip (M1, M2, Intel), check “about this mac” in the upper left corner of your mac to determine your chip-type. An google instructions if needed, e.g. how to install conda on an M1 mac
Set-up:
- Install X-code: Open App-Store and install (has important compilers for software development)
- X-quartz: https://www.xquartz.org/
- Latex (or tinytex): https://tug.org/mactex/mactex-download.html
- Note: Mactex is quite “heavy” with over 5GB of space
- Alternatively you can also use “tinytex” (install quarto first, see below)
- https://quarto.org/docs/output-formats/pdf-engine.html
- then run
quarto install tinytexfrom the command line
- Home-brew: https://brew.sh/
- Conda:
- Either full anaconda, or mini-conda, or mini-forge
- Google specific instructions for your Mac’s chip (M1, M2, Intel)
- I used mini-forge on an M1 and haven’t had any issues
- https://github.com/conda-forge/miniforge?tab=readme-ov-file
- cd ~/Downloads
- chmod a+x Miniforge3-MacOSX-arm64.sh
- ./Miniforge3-MacOSX-arm64.sh
- cd ~/Downloads
- https://conda.io/projects/conda/en/latest/user-guide/install/macos.html
- Either full anaconda, or mini-conda, or mini-forge
- R: https://cran.rstudio.com/
- R-studio: https://posit.co/download/rstudio-desktop/
- Quarto https://quarto.org/docs/get-started/
- Jupyter:
python -m pip install notebook - VS-Code: https://code.visualstudio.com/download
- Install useful VSC extensions
- Python
- Jupyter
- Quarto
- Prettier - Code formatter
- R
- Rainbow CSV
- R-tools
- Paste Image
- Install useful VSC extensions
- Mathpix (
optional): Allows users to photograph math equations with their phone or upload images, converting them into digital text using OCR and math-specific algorithms. This makes equations usable in documents or problem-solving applications, making it a valuable tool for students, educators, and researchers needing quick digitization for analysis. https://mathpix.com/ - Get R working in VS-Code with
.ipynb(optional)- Run the following to get R working inside VS-code with
ipynb - Make sure Jupyter is installed first
- https://stackoverflow.com/questions/56497422/using-jupyter-r-kernel-with-visual-studio-code
- open terminal
- start an R shell > type
R - run
- install.packages(‘IRkernel’)
- IRkernel::installspec()
- start an R shell > type
- Run the following to get R working inside VS-code with
Windows
Install the following
- Latex
- Anaconda or Mini-conda
- R and R-studio
- Quarto
- Jupyter
- VS-code
- Install useful VSC extensions
- Python
- Jupyter
- Quarto
- Prettier - Code formatter
- R
- Rainbow CSV
- R-tools
- Paste Image
- Install useful VSC extensions
On Windows, users have two primary options for installing the code stack: either directly on the Windows side or within the Windows Subsystem for Linux (WSL).
- Installing on the Windows Side:
- Users can download and install software packages individually. For example:
- For Python, users can download and install the latest version from the official Python website.
- For text editors or IDEs, popular options like Visual Studio Code, Sublime Text, or Atom can be downloaded from their respective websites.
- For other components like Git, Anaconda, or database management systems, users can download and install them individually from their official sources.
- This approach allows users to directly access and use the software within the Windows environment without the need for virtualization or additional setup.
- Users can download and install software packages individually. For example:
- Installing within WSL: (
recommended)- Windows Subsystem for Linux (WSL) allows users to run a Linux distribution alongside the Windows operating system.
- Users can install a Linux distribution such as Ubuntu, Debian, or others from the Microsoft Store.
- Once the Linux distribution is installed, users can access a Linux terminal and use package managers like apt to install the code stack components. For example:
- Python can be installed using
sudo apt install python3. - Text editors like Vim or Emacs can be installed using
sudo apt install vimorsudo apt install emacs. - Git can be installed using
sudo apt install git. - Other components like MySQL or PostgreSQL can also be installed using the appropriate package manager commands.
- Python can be installed using
- With WSL, users can work with the code stack in a Linux environment while still having access to their Windows files and applications through a shared file system.
- Additionally, Windows applications like Visual Studio Code can be installed on the Windows side and configured to work with files and projects stored within the WSL file system.
Both approaches have their advantages and can be tailored to the preferences and requirements of individual users.
If using Windows, we recommend using the WSL the option, since generally it will strengthen your computer science skills.
Windows Subsystem for Linux (WSL) offers several advantages for computer science developers:
Access to Linux Tools and Environments: Many computer science tools and development environments are originally designed for Linux systems. With WSL, developers can access these tools and work in a Linux environment directly on their Windows machine, without the need for dual-booting or running a virtual machine.
Familiarity with Linux: Linux is widely used in the development community, and many developers are familiar with its command-line interface and utilities. WSL allows Windows users to gain experience and proficiency in Linux without needing to switch to a Linux-based operating system full-time.
Compatibility and Interoperability: WSL provides a seamless integration between Windows and Linux environments. Developers can work on projects that require Linux-specific tools or libraries while still having access to Windows applications and resources. This interoperability enhances productivity and streamlines development workflows.
Testing and Deployment: WSL enables developers to test their applications in a Linux environment before deploying them to production servers. This helps ensure compatibility and stability across different platforms, reducing the risk of unexpected issues when deploying to a Linux server.
Development Flexibility: With WSL, developers have the flexibility to choose their preferred development environment and tools. Whether they prefer Windows-based IDEs or text editors, or command-line tools and terminals in a Linux environment, WSL allows developers to work in the environment that best suits their needs and preferences.
Performance: WSL has made significant improvements in performance over time, offering faster file system performance and reduced overhead compared to traditional virtual machines. This allows developers to run Linux applications with minimal impact on system performance.
Overall, WSL provides a convenient and efficient solution for computer science developers who need access to Linux tools and environments while working on Windows machines. It bridges the gap between Windows and Linux ecosystems, offering the best of both worlds for developers.
WSL setup on windows
This optional video will guide you through setting up a data-science workflow in WSL on a windows machine.
Miniforge Installation
- The software installation process is straightforward. The installers can be found at the official Miniforge GitHub repository:
- https://github.com/conda-forge/miniforge
- Scroll down to the Miniforge3 section and download the installer that matches your operating system (Windows, macOS, or Linux) and CPU architecture (e.g., x86_64 for standard Intel/AMD processors, or Apple Silicon/ARM64 for M-series Macs).
- Detailed, step-by-step installation instructions for each OS can be found here:
- Submission:
- To verify that you have successfully installed Miniforge and can use the command-line interface, open your terminal (Terminal on macOS/Linux, or Miniforge Prompt / Anaconda Prompt on Windows) and type the following command to display your installed version:
conda --version - Take a screenshot of your terminal showing the output of this command (make sure to include your system clock/date somewhere in the screenshot).
- Save the screenshot to your
FIRSTNAME_LASTNAME_ASSIGNMENT1folder under the nameminiforge.png. - If you encounter any issues during the installation or configuration process, please contact your TA for assistance.
- To verify that you have successfully installed Miniforge and can use the command-line interface, open your terminal (Terminal on macOS/Linux, or Miniforge Prompt / Anaconda Prompt on Windows) and type the following command to display your installed version:
Visual studio code (VS) Installation
- Installation (mac+windows): https://code.visualstudio.com/download
- If you need further installation instructions then please watch the following videos
- Windows: https://www.youtube.com/watch?v=MlIzFUI1QGA
- Mac: https://www.youtube.com/watch?v=bJaBHGKHv9A
- Submission:
- To verify that you have installed VS-code, take a screen-shot of VS-code running on your machine (make sure to include the date AND your name in text somewhere in the screenshot). Add the screen shot to your FIRSTNAME_LASTNAME_ASSIGNMENT1 folder under the name vsc.png
- If you have any issues with the installation then contact your TA for help.
Running codes
IMPORTANT: As part of the assignment, you must watch the following video. It contains important information.
When done with the video, please do the following;
- Download the following folder: .zip
- Please repeat the exercise shown in the previous video in your FIRSTNAME_LASTNAME_ASSIGNMENT1 folder.
- HTML: create a hello world html file –> hello.html
- MD: create a hello world html file –> hello.md
- PY: create a hello world python file –> hello.py
- Run with VS code and from command line
- IPYNB: create a hello world jupyter notebook file –> hello.ipynb
- Run with both VS code and Jupyter notebook
- IMPORTANT:
- Make sure you change the files in some way.
- Don’t submit the files unchanged, or else you will be asked to repeat the exercise.
- Make sure your first and last name appears in each file that you modify.
Example file tree for .zip submission.
FIRSTNAME_LASTNAME_ASSIGNMENT1
   ├── miniforge.png
   ├── hello.html
   ├── hello.ipynb
   ├── hello.md
   ├── hello.py
   └── vsc.png
References
Disclaimer: This document is not an original work. It contains content from many sources and is for educational purposes only.
Sources:
- https://www.w3schools.com/python
- https://docs.python.org/3/tutorial/
- Intro to Python for Computer Science and Data Science: Learning to Program with AI, Big Data and the Cloud. Pearson Education